Saturday, July 16, 2016

Oklahoma Row by Row Experience - Day One

I decided to pick up some of the patterns from this year's Row by Row Experience. All of the United States plus Canada has quilt shops participating. The patterns are free and the shops sell kits if you want to make their block in the same fabric. This year's theme is "Home Sweet Home" which resonates with me. I love the comfort of home. You can find all the Oklahoma shops, blocks and license plates on Facebook at Oklahoma Row by Row.

My husband decided to drive me on my adventure on his days off. Wahoo!! I love a good drive in the country and since we are rural - there was plenty of country to cover before we got to towns or cities to collect patterns. The first day we covered 215 miles, visiting 4 lovely quilt shops.

Bernina Center - Lawton, OK

Our first stop was at the Bernina Center in Lawton, OK. It's a small shop in a strip of stores. They seem to be geared for embroidery. I walked in and immediately was in thread Heaven. As a garment or quilt stitcher, I tend to be boring with my threads. I piece in dark or light. Done. The Bernina Center has more red thread hues than I ever knew was possible. The blues? I swooned!

Quilt N Bee - Cache, OK
And their block is one of my favorites showing local highlights. It has Mt Scott - the highest point in Oklahoma. A soldier saluting - a nod to Ft. Sill Army base. A teepee. Plus 2 Bison from the Wichita Wildlife Preserve. Love it! I decided to buy the kit to be able to have the proper camo and such for the block.

Our next stop was the Quilt N Bee in Cache, OK. I admit I had never been to this tiny town, much less knew it was there. The highway skirts it. I am so glad the Row by Row sent me here. Quilt N Bee is a bright, colorful shop with more lovely quilts than I could count. I was so lost in color and pattern that when the friendly clerk greeted me I was confused - I was in colorful, quilty world.

Quilt N Bee's block is vertical with a quaint house, flowers and a picket fence with a quilt flapping in the breeze. I didn't buy the kit as it was almost $20 but they had went so far as to cut out the flower shapes - I should have bought it to save myself time. Sighssss ...


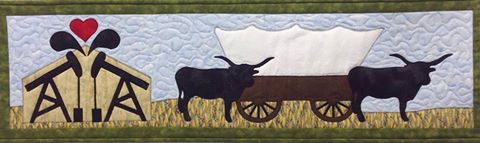
We headed south and back east to the sister Bernina Center in Duncan, OK. More fabulous threads. I really love the plethora of thread colors. I may have to expand my horizons. This block is also tied to their small city. A pair of oil field pump jacks, a couple of longhorn cows from being on the main cattle drive route and a prairie schooner for the settlers from the Land Run. I'm loving the Bernina Center's creativity and local ties.
Bernina Center - Duncan, OK

Our loop took us back north on rural highways to Beth's Quilting Quarters and Fabric Shoppe in Blanchard, OK. Beth's quilted my younger daughters quilt, so I know their shop. They have excellent cottons, so many great quilt samples plus a large classroom. They have multiple quilt guilds that hold meetings at their store which seems so right to me. I love the hometown feeling in Beth's.

Beth's Quilting Quarters - Blanchard, OK
Their patriotic block is right up my alley. A background of patriotic words under a red and white bunting swag with a perfect half circle of blue fabric with white stars. I have close to a dozen t shirts that feature flags and eagles - I am a serious Patriot. I bought this kit too for the special fabrics.

We could have stopped in at the closest 2 quilt shops to our place but time was against us. We weren't able to start out until after chores and lunch, so closing time forced us to stop. I will visit them when I next grocery shop.

I haven't started any of the blocks yet, however I do NOT want this to be a bag of UFO's. Though technically they aren't just unfinished, they are un-started. I ordered some double sided fusible webbing online to make the applique easier. In the past I have basted or glued applique and I really want to try the fancy way I see used by so many quilters.

Have you explored the Row by Row in your state?


Friday, July 8, 2016

Testing Peek A Boo Pachyderm by Quilt Doodles Doodles

This is our newest barn cat, rather than the quilt.

Happy day!!

I'm testing a new pattern for Cindy over at Quilt Doodle Doodles. She does adorable designs. Fun piecing paired with sweet applique. I subscribe to her block of the month making a holiday quilt and was delighted to test a couple of her previous patterns. She is all about the joy of creating.


Peek A Boo Pachyderm is intentionally scrappy using 4 different fabrics from 3 color groups plus a neutral. I shopped my stash - part of my personal challenge. I found several candidates and took pictures. Looking at my fabrics thru photos shows me a different perspective. This time I did change my fabric choices and I'm so glad I did. My original choice of tan for neutral was blah. Substitute a sunshine yellow and my choices were singling loud! I'm that kind of quilter, LOL.


Cindy used light, medium and dark in her fabric choices so I echoed this. It looks incredible when you step back. Plus it gives you liberty to choose your favorite fabrics. No quilt police here.


As I stitched half square triangle units and strip sets, I started loving the play of fabric patterns, colors and how they all were uniting. I don't always see the potential when I start with a group of fabrics. This group had me feeling cautious. I worried they were too different. I was wrong. They look great.


Stitch. Press. Pin baste. Quilt.


Check this beauty out!


I'm loving it!
I did simple echo quilting and I love it!

Thank you Cindy for allowing me to test Peek A Boo Pachyderm!


Tuesday, June 28, 2016

Cooks need Potholders!


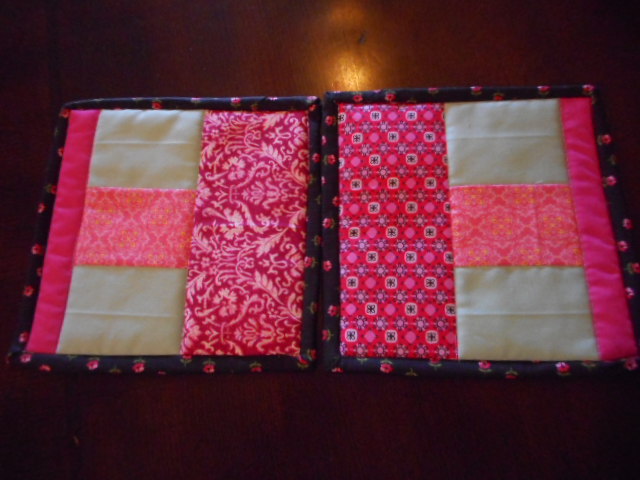
A lovely young friend is starting a side career selling Pampered Chef products and approached me to host a party. I love to cook, so of course I said Yes! The items they sell are priced a bit high for me but I want to help my friend. I invited everyone. I mean everyone! I went thru my Facebook list and clicked like a maniac. I told them if they will bring a friend, I will have a gift for them. Then I got busy sorting and sewing. What do all chefs need? Potholders!!


I sorted thru scraps, leftover units from quilts, remnants of batting, I even had scraps of the foil like, insulating batting. Win-win! I could have whipped out a dozen pairs if I had used yardage but that would have been too easy. And boring.


I used cottons from stitching my daughter scrub tops.


Scraps from Celtic Solstice.


Scraps from both, LOL.


Toss in pieces from Wildflower Park.


Skirt cotton and a little Celtic Solstice.

Skirt and leftover backing

It has been a great time to reminisce about past projects. I have 7 sets for guests to choose from and pieces cut to make more, though the party is tomorrow. Maybe I will get to keep some for myself. :)


Tuesday, June 7, 2016

Wolf Quilt construction


My unnamed quilt block paired with wolves is proceeding beautifully. Each block has two basic units, repeated a zillion times .... You get the idea - repetitive and quick!


I drew out my diagram, then changed it. But didn't draw it out as I was actually getting tired of drawing by the time I got this far. I'm much more enthusiastic when I get to use crayons or markers.


To keep my block directions of rows and columns in the proper order, I decided to do this quilt in sections. A simple turn of the block changes the look, so being correct is a huge part of the potential success.

I put a tension rod across the front of the closet, added clamps and I can hang things.

I'm stitching the 4 quarters together, then will stitch those into halves, then voila, a whole quilt! Sounds easy - Ha!

The quilt top goes several feet over. It's a big 'un!

Actually it was pretty simple. Who knew right? The borders went on easily. I mitered the inner tan border as well as the wider wolf border. I'm so happy to be in my own space for sewing now. I have a big folding table to the left of my machine and it's amazing to have it hold the weight and bulk of a king size quilt.


I found a super cool backing in shades of green with dots that make me think of the slides from microbiology class. I love the fabric but they cut it really crooked. Boo! Thankfully I always buy extra just in case.


Check out those wolves running at you. The quilt top is square, so technically the kids will be able to use it any which direction. The blocks have direction but you can choose where the echo rests. I dropped it at the local quilt shop to be long armed. I am eager to get it back, bind it and get some great pictures. More soon ...

Saturday, May 14, 2016

Choosing fabrics


I chose the fabrics for the wolf quilt based on what I thought my son and his lady would like. His favorite color is green, then blue. She loves wolves .... You can see where I found the wolf fabric so perfect - greens, blues, wolves - tada!


I pulled from my stash first and used the dots in the fabric selvedge to get as close to the greens and blues as possible. I wanted more variety so I started looking at fabrics everywhere I went, LOL. Walmar, Hancocks, thrift stores - everywhere!


I have a great stash. However I favor bright colors. This quilt called for muted colors - not really my thing. I stretched my comfort level to seek out darker colors. I originally wanted to include grays but it didn't stand out enough from the neutrals, so I eliminated them. I assume everyone auditions fabrics endlessly waiting for a bright light to flash and applause so you know you got it right. Right?!


Thankfully as I created units and blocks, I really started loving the forest-y colors. I love how the block can create endless designs with a simple turn. I love the design. It is turning out just as I hoped.


Saturday, May 7, 2016

Name this block

Pic courtesy of http://www.generations-quilt-patterns.com/jacobs-ladder-quilt.html

I packed up the Christmas decorations and settled into for some winter stitching. I am making a quilt for my oldest son and his lady. I thought I wanted a Jacob's ladder quilt, then I found a modified Jacob's block and decided to go a new direction. However I do not know if this new block has a name even though I have seen it on several websites used in different patterns.


This is the top left corner 4 unit of the Jacob's Ladder. It's two 4 patches and two half square triangles. Lay them out in different ways and you get some really cool patterns.


I am using mid to dark blues and greens with a tan background. The inspiration is some wolf fabric that the kids liked. I wanted something natural to go with it. The blocks will be laid out in something of a radiating diamond design. As though you dropped a pebble in the pond that the wolves drink. The actual wolf fabric will be used as one of the borders. I considered using it as a main fabric in a quilt but really had no idea what pattern to highlight it best.


Here's to a new adventure! :D


Thursday, March 10, 2016

Lace up back, instead of a zipper


In the midst of babies and the holidays I managed to stitch up a formal for a sweet young lady. Rather than putting a simple zipper in the back like usual, I decided to modify the pattern and put in a lace up back.


Yes. I am a glutton for punishment.


 It actually went together so much easier than I ever expected. The most difficult task was turning the skinny little strings. I thought it through and left it as one long strap until after it was turned. I did buy a loop turner which helped tremendously.


I sliced 2 inch segments and used some leftover bias tape to organize my loops. I measured what length I needed, then drew lines on the bias tape an inch apart, so I could put each loop within that inch. It took a lot of pinning but felt stable. I did 2 lengths - one for each side of the back dress opening. I even got picky enough that I made sure the seams on the loops all went one direction on one side and the opposite direction on the other.


I stitched the length of the bias tape to secure the loops to the tape. Then I pinned the loop length into the dress to baste. You notice it was turned the wrong way? The basting stitches attach it first to the dress and will be hidden once the dress is completed.


A quick baste on one side, then the other, checking to be sure the loops match up to one another. Turned the length out and topstitched. This makes the loops stitched extra secure as they are sewn three times. Once to the bias tape, then basted into the dress and finally topstitched. The final stitches go right on the very edge of the bias tape or just over, so that the tape is NOT seen. To be sure, I pulled on all the loops. Those babies are secure!


Now if I could just slow down lenough to hide my clumsy handstitching on the lining which finished covering the construction of the 5 layer bodice and princess lacing.


Modesty is very important. I made a simple triangle-ish shape, attached modesty panel to be sure the young lady's back would be properly covered. To firm up the panel, I tucked a short piece of boning at the top, inner edge. When it is flipped over you won't see the stitches securing it, yet the boning holds the modesty panel straight across without sagging.

Modesty panel before turning right side out
I take the most awkward pictures

My camera trashed the color of the finished back of the dress. It is a gorgeous bright blue. Thankfully, you get the idea of the transformation, goofy color and all.


Now to find a way to de-glitter my sewing space

Now how to clean all the glitter up from my sewing space .....